How to Set Up Automatic Payments for Usps Labels
PayPal Payments is our recommended PayPal plugin. If you are using an existing PayPal product, you will find details to upgrade here.
WooCommerce PayPal Payments is a full-stack solution that offers powerful and flexible payment processing capabilities. Set up quickly. Enable payment acceptance easily. Offer your customers a seamless checkout experience and get paid quickly.
WooCommerce PayPal Payments is the only payments plugin that includes PayPal, Pay Later, credit and debit card processing, and local payment methods.
By integrating with WooCommerce PayPal Payments you can:
- Offer full-stack payment processing – the choice of payment methods for your customers.
- Smart payment buttons – Present relevant payment methods to your customers in specific markets. With one integration, sellers can automatically offer more payment method options as they become available.
Requirements ↑ Back to top
To install WooCommerce PayPal Payments, you need:
- WordPress Version 5.3 or newer (installed)
- WooCommerce Version 3.9 or newer (installed and activated)
- PHP Version 7.1 or newer
- PayPal business account
Installation ↑ Back to top
- Log in to WordPress Admin.
- Go to Plugins > Add New.
- Search for the WooCommerce PayPal plugin.
- Click on Install Now and wait until the plugin is installed successfully.
- You can activate the plugin immediately by clicking on Activate now on the success page. If you want to activate it later, you can do so via Plugins >Installed Plugins.
Setup and Configuration ↑ Back to top
Connect to PayPal Account ↑ Back to top
Follow the steps below to connect the plugin to your PayPal account:
Testing in Sandbox ↑ Back to top
Note :All transactions done in sandbox are for testing purposes only and will not result in receiving funds.
- Visit https://developer.paypal.com
- Log in using your PayPal account credentials
- Go toSandbox -> Accounts
- Either create a new Business account or use the existing pre-generated business account.
- For the sandbox account you would like to use, click the … underManage Accounts and selectView/Edit Account
- Note down the email address and password for the account.
Enable Vaulting with PayPal Sandbox ↑ Back to top
- Login to developer.paypal.com
- Under My Apps & Credentials click on Default Application
- Under the SANDBOX APP SETTINGS section, click on the Advanced options link displayed after Accept payments Enable one-time and subscription payments

4. Enable the option Vault and click Save
To make Vault work with WooCommerce Subscriptions, follow the steps below.
1. On PayPal Payments settings, enable the sandbox option and connect to Sandbox Account. (The sandbox credentials for Business Account can be found on the left sidebar of developer.paypal.com -> Sandbox -> Accounts)
2. Once the account is connected, disable the options Pay Later on Checkout, Pay Later on Single Product Page and Pay Later on Cart
3. Save the changes
4. Enable the option Vaulting under PayPal Checkout Settings and Save changes
Now you can test automatic payments for subscriptions via PayPal
Enable Vaulting on your Live Account ↑ Back to top
Vaulting allows registered buyers to save PayPal and Credit Card accounts. It also allows WooCommerce PayPal Payments to be used for WooCommerce Subscription renewals. To enable vaulting on your PayPal account, follow these steps:
- Connect your account to WooCommerce (see above).
- Visit https://developer.paypal.com.
- Login with the same PayPal account connected to WooCommerce.
- Click Live under My apps & credentials.
- Click MyApp_WooCommerce_Developers.
- Scroll down to Live App Settings.
- Click Advanced options next to Accept Payments.
- Place a checkmark next to Vault.
- Click Save at the bottom of the box.
Note: To be able to use PayPal Payments for Subscriptions renewals, your account also has to be approved for Reference Transactions.
PayPal Card Processing ↑ Back to top
After you have completed the onboarding process, follow these steps to navigate to the PayPal Card Processing settings:
- Go to WooCommerce > Settings > Payments > PayPal.
- Click the PayPal Card Processing tab.
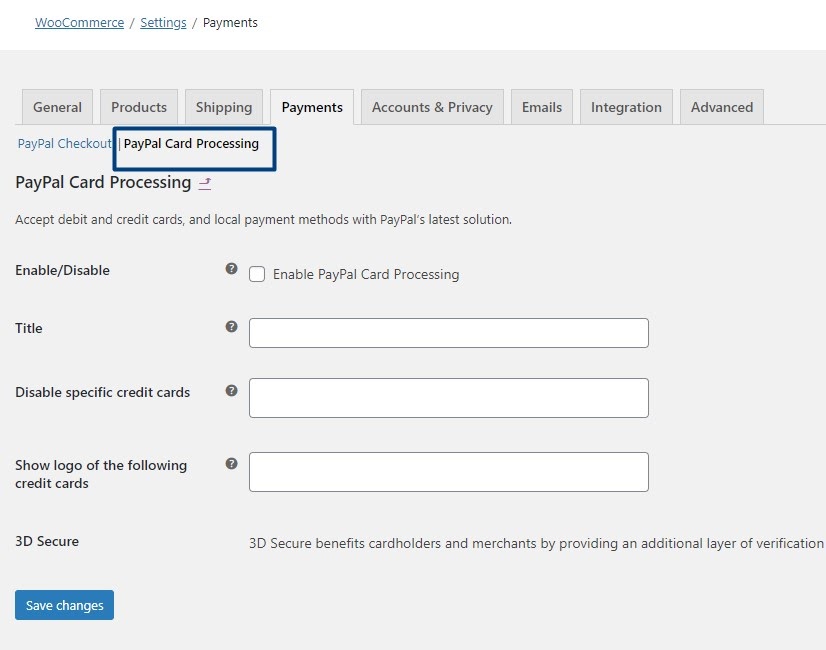
You can configure the following settings for PayPal Card Processing:
- Enable/Disable – Once enabled, the Credit Card option will show up in checkout.
- Title – This controls the title that the user sees during checkout.
- Description – This controls the description that the user sees during checkout.
- Disable specific credit cards – By default, all possible credit cards will be accepted. You have the option to disable certain credit cards.
- Show logo of the following credit cards – Define which credit cards you want to display at checkout.
- 3D Secure – 3D Secure benefits cardholders and merchants by providing an additional layer of verification using Verified by Visa, MasterCard SecureCode and American Express SafeKey. Learn more about 3D Secure.
General Settings ↑ Back to top
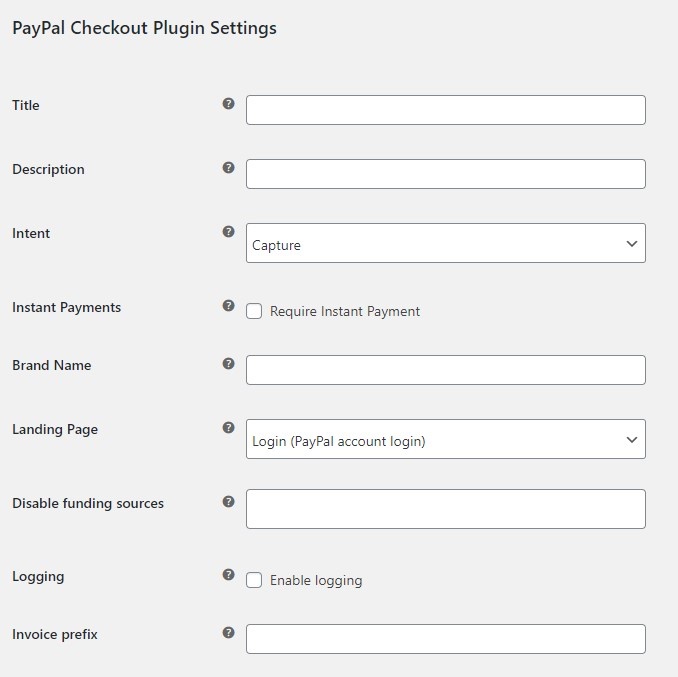
- Title – The title the user sees during the checkout process.
- Description – The description the user sees during the checkout process.
- Intent – The intent to either capture a payment immediately or to authorize a payment for an order after an order is created.
- Instant Payments – If you enable this setting, PayPal will be instructed to not allow the buyer to use funding sources that take additional time to complete (e.g. eChecks). Instead, the buyer will be required to use an instant funding source, such as instant transfer, credit/debit card, or Pay Later.
- Brand Name – Control the name of your shop that customers will see during the payment process.
- Landing Page – Type of PayPal page to display.
- Disable funding sources – By default, all possible funding sources will be shown. You have the option to disable certain funding sources.
- Logging – Enable logging of unexpected behavior. This can also log private data and should only be enabled in a development or staging environment.
- Installation prefix – If you use your PayPal account with more than one installation, you should use a distinct prefix to separate those installations.
Checkout ↑ Back to top
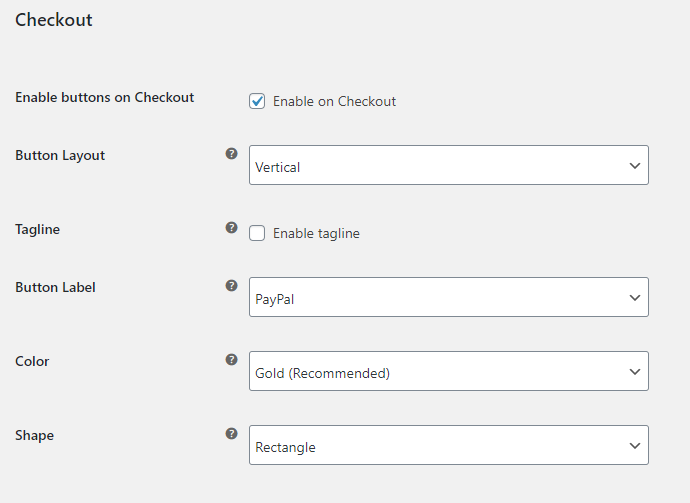
- Enable buttons on Checkout – Enable/Disable PayPal buttons at checkout.
- Button Layout – If additional funding sources are available to the buyer through PayPal, then multiple buttons are displayed in the space provided. Choose "vertical" for a dynamic list of alternative and local payment options, or "horizontal" when space is limited.
- Tagline – Add a tagline. This will only appear if you select a horizontal layout.
- Button Label – This controls the label on the primary PayPal button.
- Color – Controls the background color of the primary PayPal button. Use "Gold" to leverage PayPal's recognition and preference, or change it to match your site design or aesthetic.
- Shape – The pill-shaped button's unique and powerful shape signifies PayPal in people's minds. Use the rectangular button as an alternative when pill-shaped buttons might pose design challenges.
Pay Later Messaging on Checkout ↑ Back to top
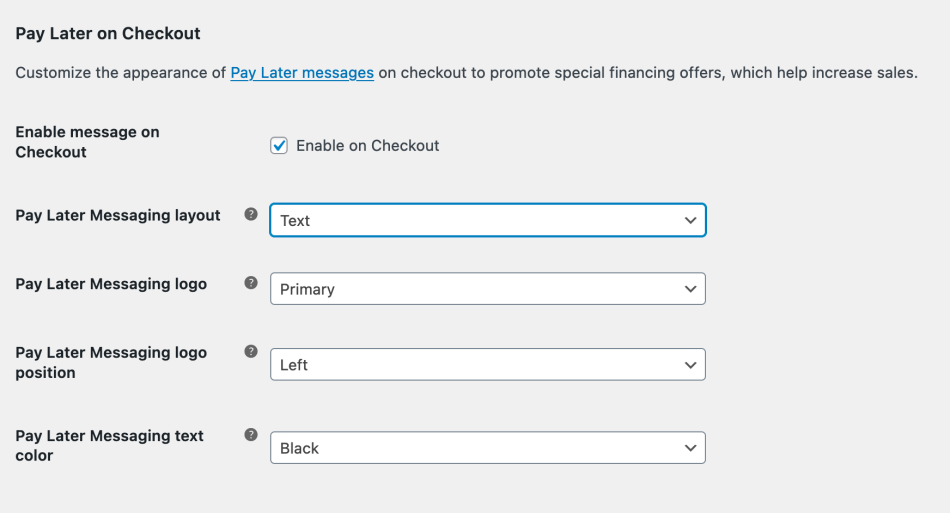
- Enable message on Checkout – Enable/Disable the Pay Later message at Checkout.
- Pay Later Messaging layout – The layout of the Pay Later message.
- Pay Later Messaging logo – What logo the Pay Later message contains. Only applicable, when the Text layout style is selected.
- Pay Later Messaging logo position – The position of the Pay Later logo. Only applicable, when the Text layout style is selected.
- Pay Later Messaging text color – The color of the text. Only applicable, when the layout style Text is used.
Button on Single Product ↑ Back to top
This section has the same appearance and options as the checkout settings above.
- Enable buttons on Single Product – Enable/Disable buttons on Single Product.
- Button Layout – If additional funding sources are available to the buyer through PayPal, then multiple buttons are displayed in the space provided. Choose "vertical" for a dynamic list of alternative and local payment options, or "horizontal" when space is limited.
- Tagline – Add the tagline. This line will only show up if you select a horizontal layout.
- Button Label – This controls the label on the primary button.
- Color – Controls the background color of the primary button. Use "Gold" to leverage PayPal's recognition and preference, or change it to match your site design or aesthetic.
- Shape – The pill-shaped button's unique and powerful shape signifies PayPal in people's minds. Use the rectangular button as an alternative when pill-shaped buttons might pose design challenges.
Pay Later Messaging on Single Product ↑ Back to top
This section has the same appearance and options as the checkout settings above.
- Enable message on Single Product – Enable/Disable Pay Later message on Single Product.
- Pay Later Messaging layout – The layout of the Pay Later message.
- Pay Later Messaging logo – What logo the Pay Later message contains. Only applicable, when the layout style Text is used.
- Pay Later Messaging logo position – The position of the Pay Later logo. Only applicable, when the layout style Text is used.
- Pay Later Messaging text color – The color of the text. Only applicable, when the layout style Text is used.
Cart ↑ Back to top
This section has the same appearance and options as the checkout settings above.
- Buttons on Cart – Enable/Disable PayPal buttons on a Cart.
- Button Layout – If additional funding sources are available to the buyer through PayPal, then multiple buttons are displayed in the space provided. Choose "vertical" for a dynamic list of alternative and local payment options, or "horizontal" when space is limited.
- Tagline – Add the tagline. This line will only show up if you select a horizontal layout.
- Button Label – This controls the label on the primary button.
- Color – Controls the background color of the primary button. Use "Gold" to leverage PayPal's recognition and preference, or change it to match your site design or aesthetic.
- Shape – The pill-shaped button's unique and powerful shape signifies PayPal in people's minds. Use the rectangular button as an alternative when pill-shaped buttons might pose design challenges.
Pay Later Messaging on Cart ↑ Back to top
This section has the same appearance and options as the checkout settings above.
- Enable message on Cart – Enable/Disable the Pay Later message on Cart.
- Pay Later Messaging layout – The layout of the Pay Later message.
- Pay Later Messaging logo – What logo the Pay Later message contains. Only applicable, when the layout style Text is used.
- Pay Later Messaging logo position – The position of the Pay Later logo. Only applicable, when the layout style Text is used.
- Pay Later Messaging text color – The color of the text. Only applicable, when the layout style Text is used.
Mini Cart ↑ Back to top
This section has the same appearance and options as the checkout settings above.
- Buttons on Mini Cart – Enable/Disable PayPal buttons on a mini cart.
- Button Layout – If additional funding sources are available to the buyer through PayPal, then multiple buttons are displayed in the space provided. Choose "vertical" for a dynamic list of alternative and local payment options, or "horizontal" when space is limited.
- Tagline – Add the tagline. This line will only show up if you select a horizontal layout.
- Button Label – This controls the label on the primary button.
- Color – Controls the background color of the primary button. Use "Gold" to leverage PayPal's recognition and preference, or change it to match your site design or aesthetic.
- Shape – The pill-shaped button's unique and powerful shape signifies PayPal in people's minds. Use the rectangular button as an alternative when pill-shaped buttons might pose design challenges.
Customer Experience ↑ Back to top
Troubleshooting ↑ Back to top
Having a problem? Follow these steps to make sure everything is setup correctly:
- Please ensure that your site meets the plugin requirements.
Questions ↑ Back to top
Have a question or need some assistance? Get in touch with a Happiness Engineer via the Help Desk.
How to Set Up Automatic Payments for Usps Labels
Source: https://woocommerce.com/document/woocommerce-paypal-payments/
0 Response to "How to Set Up Automatic Payments for Usps Labels"
Post a Comment